Tampilkan postingan dengan label Komputer. Tampilkan semua postingan

Sabtu, 05 November 2011

Manipulasi system untuk mempercepat buffering video

15 komentar
Manipulasi system untuk mempercepat buffering video | Kalian semua pasti kesal dengan koneksi Internet yang lemot/lelet, padahal pingen buka TV online atau buka-buka video di Youtube dll, tapi bufferingnya lama baget, kecek orang bengkulu "lelet nian" al hasil putus-putus.begitulah kisahnya jika keinginan gak sebanding dengan keadaan,bukan menghina coy,,,,, hahahahaha. Oya, sebelum saya memberikan tutorial Manipulasi system untuk mempercepat buffering video sebelumnya apa kalian tau apa itu Buffering??? klo blom Johan Jm kasi tau dulu dech. Buffering itu adalah proses loading pada saat kita memutar video secara online. Dengan hanya bermodalkan Notepad, Nonton TV online, buka-buka video di Youtube atau dimanapun Insya Allah proses Buffering video akan berjalan cepat.

Hokeh gk perlu basa basi lagi langsung aja kita ke lab praktikum...hahahahaha mau praktek ya om??? ya iyalah klo gk diperaktekin gmn mo tau hasilnya. wkwkwk mampus lu dimarahain ma Johan Jm.


langung aja buka modul praktek Manipulasi system untuk mempercepat buffering video.

A.  Alat dan Bahan
             Adapun Persiapan yang dilakukan untuk Manipulasi system untuk mempercepat buffering video sebagai berikut:
  1. Satu unit Komputer (PC) atau Laptop
  2. Koneksi Internet
  3. Secangkir Kopi Kapucino
  4. Sebungkus Rokok Clas Mild
  5. Cewek cantik yang mendampingi
B. Tujuan
             Tujuan dilakukannya peraktikum ini ialah untuk mempercepat mempercepat buffering video

C. Langkah Percobaan
Perama, Klik menu Star pada Komputer atau laptop kalian. klik run kemudian ketikan system.ini, maka akan muncul tampilan Notepad yang ada tulisannya seperti gambar dibawah ini.
Manipulasi system untuk mempercepat buffering video
Kedua, Tambahkan text dibawah ini baris paling akhir
page buffer=1000000Tbps
load=1000000Tbps
download=1000000Tbps
save=1000000Tbps
back=1000000Tbps
search=1000000Tbps
sound=1000000Tbps
webcam=1000000Tbps
voice=1000000Tbps
faxmodemfast=1000000Tbps
update=1000000Tbps
Sehingga menjadi seperti gambar dibawah ini
Ketiga, Simpan file yang kalian sudah edit tadi.
Keempat, Restart Komputer atau Laptop kalian.

D. Analisa dan Pembahasan
Setelah langkah-langkah perkaktek Manipulasi system untuk mempercepat buffering video diatas sekarang coba kalian buka salah satu  video online dengan koneksi internet kamu dan bandingkan perbedaan yang terjadi.

E. Kesimulan dan Saran
1. Kesimpulan
Dari peraktek Manipulasi system untuk mempercepat buffering video yang telah dilakukan, dapat disimpulkan percobaan berhasil karna buffering video semakin cepat.
2. Saran
Jangan melakukan percobaan ini untuk hal-hal buruk seperti nonton video porno dengan cewek cantik yang mendapingi kalian tadi.....hahahahahahaha

Menggabungkan dua Modem untuk satu Komputer

8 komentar
Menggabungkan dua Modem untuk satu Komputer | pernahkan terpikirkan oleh kalian semua untuk Menggabungkan Dua modem dial up yang anda punya pada satu komputer atau dalam bahasa bugis-nya Multi Connection yang tentu saja secara logika tujuan-nya untuk menambah/mempercepat koneksi ke internet. kalo kalian, belum saya sudah hahahahahaha.......

Tapi kalo kalian sudah bernah berpikir untuk Menggabungkan dua Modem untuk satu Komputer namun belum tau caranya, nah pada postingan kali ini Johan Jm akan memberikan cara Menggabungkan dua Modem untuk satu Komputer sehingga koneksi lebih kencang pastinya. cayo dak yo !!!

adapun yang kalian perlu sediakan untuk Menggabungkan dua Modem untuk satu Komputer,  yaitu:

  • Satu unit Komputer (PC) atau Laptop
  • 2 Buah Modem dial up beserta kartu providernya
  • Secangkir Kopi Kapucino dan Sebungkus Rokok Clas Mild
  • serta perangkat lunak (Software) wooweb pro dan hamachi


ok kita kembali ke topik bahasan, saya anggap persiapan sudah lengkap dan software-nya sudah terinstal di komputer kalian. berarti kita sudah siap perang....mo perang dengan siapa om??? hehehehe,,,,,

Setelah smuanya terinstal...buka wooweb kalian kemudian klik quick setup maka akan muncul gambar seperti berikut
Menggabungkan dua Modem untuk satu Komputer
silahkan pilih modem kalian...isi username dan passwordnya dan lihat dibawah network device catat IP address dan subnet mask nya bisa dirubah sesuai selera...lanjut klik OK
setelah klik OK kalian akan masuk ke tampilan seperti di bawah
Menggabungkan dua Modem untuk satu Komputer
nah sekarang 1 koneksi sudah masuk..dan untuk menambahkan koneksi/modem lain...klik Menu Setting - Remote Conection...Kalian akan melihat tampilan seperti di bawah...
Menggabungkan dua Modem untuk satu Komputer
setelah itu klik add akan tampil seperti di bawah ini...
Menggabungkan dua Modem untuk satu Komputer

ISP/Conection Name : isi sesuai selera kalian... Kemuadian klik OK....

skarang waktunya mengoneksikan kedua koneksi modem
Nb: bisa lebih dari 2
Menggabungkan dua Modem untuk satu Komputer

klik Start Conection...
Menggabungkan dua Modem untuk satu Komputer
setelah semua modem/koneksi sudah conected akan Tampil seperti di bawah...
Menggabungkan dua Modem untuk satu Komputer
Sekarang setting Hamachi Network Interface nya...
masuk ke Control Panel - Network Connections - Klik Kanan Hamachi Network Interface kemudian Properteis maka akan Tampil seperti gambar di bawah ini
Menggabungkan dua Modem untuk satu Komputer

setelah itu klik Internet Protocol (TCP/IP) - Klik properties akan tampil seperti di bawah ini

Menggabungkan dua Modem untuk satu Komputer
isi dengan ...

IP address : 192.168.0.x (x bisa di isi 2-254)
subnet mask : 255.255.255.0
Default Gateway : 192.168.0.1 (kalian ambil dari catatan di wooweb tadi)
untuk DNS silahkan isi sesuai selera kalo Johan Jm itu pake DNS smart
setelah itu klik OK...


sampe disini saya rasa semua sudah bisa konek...
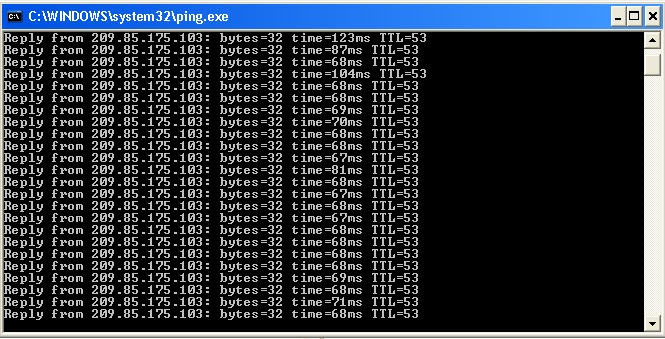
sekarang waktunya kita coba ping domain..
klik start - Run, ketik ketik ping www.google.com -t tekan enter akan tampil seperti di bawah
Menggabungkan dua Modem untuk satu Komputer
Gmn maknyos gk speed-nya.....Jika kurang puas tinggal tes downloadnya atau bisa cek speed di speedtest.net
Sampai disini dulu tutorial tentang Menggabungkan dua Modem untuk satu Komputer. Semoga Bermanfaat dan selamat mencoba

Memperbesar Virtual Memory Windows XP

0 komentar
Memperbesar Virtual Memory Windows XP | Virtual memory yang dimaksud adalah RAM (Random Acces Memory) dimana RAM ini berfungsi untuk menampung sementara data-data yang akan diproses di processor dan juga menampung sementara data-data yang telah di proses, dengan kata lain RAM adalah jembatan penghubung antara processor dengan hardisk.

Karena hardisk berupa piringan yang berputar (dengan kecepatan mekanik), maka kecepatan hardisk tidak akan bisa menyamai kecepatan processor. Maka dari itulah dibutuhkan alat untuk menyeimbangkan kedua kecepatan ini (processor & hardisk).

Karena perangkat lunak yang semakin canggih, sehingga dibutuhkan Random Access Memory yang semakin besar, maka sistem operasi generasi baru (dari jaman Windows jadul kalo tidak salah) menyediakan fasilitas untuk menggunakan kapasitas harddisk untuk digunakan sebagai memori virtual, alias memori palsu atau maya. Kalau ada pesan virtual memory low, itu karena alokasi harddisk untuk virtual memori yang diatur oleh perangkat lunak kamu, hampir habis terpakai oleh perangkat lunak yang sedang aktif.


Kalau anda punya RAM dengan ukuran kecil dan menjalankan banyak aplikasi sekaligus (mutar music, ngetik dan lain-lain) maka RAM akan cepat penuh dan akhirnya ada pesan kalau Virtual Memory Low. jadi saya sarankan anda menambah kapasitas RAM computer, soalnya komputer akan jadi lambat dikarenakan memory RAM yang sudah penuh (seperti halnya jembatan yang penuh jadi mobil dan kendaraan lainnya yang lewat harus antri).

Memory beneran dalam komputer kita ada dua, ROM (biasanya digunakan sebagai BIOS) dan RAM (yang biasanya orang-orang sebut sebagai “Memory komputer”
Oke, selanjutnya kita masuk pada tahap cara Memperbesar Virtual Memory Windows XP. Lihat langkah-langkah dibawah ini:
  1. Klik Start – Control Panel.
  2. Double Klik icon System.
  3. Pada window System properties Klik Tab “Advanced”.
  4. Ada tiga bagian dalam tab advanced, klik tombol “Settings” pada bagian performance.
  5. Pada window performance options, klik tab “Advanced”.
  6. Klik tombol change pada bagian virtual memory (paling bawah).
  7. Rubah ukuran virtual memori menjadi 4 kali lipat sebelumnya.

Selasa, 16 Agustus 2011

Make Your Home Network More Secure

0 komentar
Helping to protect your computer with a firewall
Why you need a firewall?

A firewall is a protective boundary between a computer (or a network of computers) and the outside world, where people or programs might try to access your computer without invitation. Hackers commonly use software that scans the Internet looking for computers with unprotected Internet connections. This software sends a very small message to your computer. If your computer does not have a firewall, your computer will automatically answer the message and thus announce that it is unprotected. But if you have set up a firewall, it will receive such messages and not answer them, so hackers won't even know that your computer exists.


Firewalls can be either hardware or software

A hardware firewall is a piece of equipment that you physically connect to your network. It monitors all aspects of the communications that are sent and received, and inspects the source and destination address of each message that it handles. This provides security in helping to prevent intrusions to your computer or network. A software firewall performs a similar function by using a program inside your computer instead of an external device.


Microsoft Windows XP Service Pack 2 (SP2) has a software firewall that's built in and turned on for you

This firewall, called Windows Firewall, is turned on by default so that a level of protection is in place right away. It monitors communications in the same way a hardware firewall does. Windows Firewall restricts information that comes to your computer from other computers, giving you more control over access to your data, and providing a line of defense against people or programs that try to access your computer without invitation. Regardless of whether you choose to take advantage of the Windows Firewall or another firewall available to you, keeping the firewall turned on and updated is one of the important keys to helping to protect your computer's security.

Hardware and software firewalls can be used on the same computer. By default, Windows Firewall is enabled on all connections.

Kamis, 11 Agustus 2011

Is There A Device Driver Conflict???

0 komentar
The following procedure might require you to restart your computer, which will close this troubleshooter. If possible, view this troubleshooter on another computer while you perform the steps on the computer you are troubleshooting.

One of the devices installed on your computer might be causing the problem. To pinpoint the problem, turn off all of your devices except for system devices.

To turn off your devices:
1. Open Device Manager.
2. Double-click the entire category headings, except System devices, to display the devices listed under them.
3. Right-click the first listed device, and then click Properties.
4. On the General tab, in the Device usage list, click Do not use this device (disable), and then click OK.

If the Device usage list appears dimmed, the device is necessary for your computer to function and it cannot be turned off.

5. Repeat steps 3 and 4 for each listed device, except for the system devices and your mouse.
6. Close the Device Manager, and then restart your computer.


Note:
To open Device Manager, click Start, click Control Panel, click Performance and Maintenance, and then click System. In the System Properties dialog box, click the Hardware tab, and then click Device Manager. If you still have a problem after you turn off your devices, the devices are not causing the problem. Turn all of the devices back on in Device Manager, and then click No at the bottom of this page. If you can complete Setup after you turn off your devices, there might be a problem with one or more device drivers.

To determine which device is causing a problem:
1. Open Device Manager.
2. Right-click one of the devices that you turned off, and then click Properties.
3. On the General tab, in the Device usage list, click Use this device (enable), and then click OK.
4. Restart your computer.
5. Repeat steps 1 through 4 until you experience the problem again.

If you determine that a particular device is causing the problem, contact the device manufacturer to obtain updated drivers or updated BIOS for the device.

Rabu, 10 Agustus 2011

Setting 3G phone as a modem for laptop

1 komentar
Topics this time I think is very unique, and may be you all be try it. There are two ways to use your 3G phone or device to access the internet.

1) First, using your Hand phone and Laptops Bluetooth.
2) Second, using the USB Cable for the typical mobile phone to your laptop / computer.

However, here I will tell only about the first one which is using Bluetooth. Steps below may be different for each telco (Maxis, Celcom) and phone or device model, but at least you will have little idea about how to setup 3G phone as a modem.

Step 1: On Bluetooth on your Hp.
3g on your phone, go to the Settings -> Menu -> Connections, and click the Bluetooth icon. Also set phone's visibility to "Show to all". Onwards, also named your phone or device in Preference, the "Your Phone's Name".


Step 2: Setup Bluetooth on your laptop

  • Click Start -> Control Panel -> Bluetooth Devices. Click Add ... and then Add Bluetooth Device Wizard will be displayed.
  • Checked "My device is set up and ready to be found" and click Next.
  • The wizard will search for available Bluetooth devices and displayed follow arrangement. Now, select the new device which is encountered in and click Next.
  • You will see the Passkey setup screen. Checked Let me choose my own passkey and enter your any passkey and click Next.
  • You will see your Bluetooth device installed. Once finished, you will be asked, "Add to My devices", click Yes. Enter the same Passkey in step 4 earlier, and click OK. Bluetooth Installation will be continued.
  • Click Finish to complete Add Bluetooth Device wizard.


Step 3: Setup New Connection on your laptop.

  • Go to Control Panel -> Network Connections, on the left pane, click Create a new connection.
  • You will see the New Connection Wizard window, click Next.
  • There are several options for connection, please select the Connect to Internet and click Next.
  • Then select "Set up my connection manually" then click Next.
  • Select "Connect using a dial-up modem" and click Next.
  • On Device selection screen, select the Modem - Bluetooth Modem Dun (COM21), and click Next.
  • Enter the name of the ISP and click Next.
  • Enter the ISP no phone or device. In this case I use Maxis, * 99 #. Then, click Next.
  • Connection for Availability, checked Anyone and click Next.
  • Enter your username and password, and confirm password. Click Next.
  • Onwards, checked "Add a shortcut to this connection to my desktop", and the final one click Finish.

Congratulation you just now setup a new HP 3G modem as your laptop. So you can use your internet as usual after dial a connection.

Senin, 08 Agustus 2011

Tricks Making Firefox posthaste

0 komentar
1. Enable Pipelining
Usually work with the browser sends a request to the server and waiting for a response before continuing the process. Pipelining is a more aggressive technique that allows the browser to send multiple requests at once before receiving any response to reduce the time needed to download the contents page. To activate this function type "about: config" in the address box, double-click on the "network.http.pipelining" and "network.http.proxy.pipelining" to change the value to "true" and then double-click on the "network. http.pipelining.maxrequest "and made the value" 8 ".Please note that some servers do not serve the pipelining. So, there is a possibility if the performance of this fact. Set back all the settings as early if problems occur.

2. Quick rendering
Sites are large and complex can take time to download. Firefox does not want to make you wait, so with the default settings Firefox will directly show that he received every 0.12 seconds. Although this makes the browser more impressed quickly, re-rendering the continuously increasing the total time required to display the page, we can reduce the number of re-rendering to improve performance.

Type "about: config" and press [ENTER], then right-click on the main screen and then select "New> interested."

Type "content.notify.interval" as the name of your preferences, click "ok", enter "500000" (500 thousand) and click "ok" again.

Right-click again on it and select "New> Boolean."

This time a value called "content.notify.ontimer" and set to "True" to complete your tasks.


3. More Quick Loading
If you do not manipulate mouse or touch the keyboard for 0.75 seconds, Firefox will go into the mode "low frequency Interrupt", which means the interface will become less responsive, but can load pages more quickly.

Type "about: config" and press [ENTER], right-click on the display and select "New> interested."

Type "content.switch.threshold," click "ok", enter "250000" (second quarter) and click "ok" to complete.

4. No interruptions
You can make a step further by letting Firefox at all to ignore the user interface events to finish download page. Indeed, this is rather extreme because Firefox can become unresponsive for some time, but there was not whether to try a positive effect for you.

Type "about: config", press [ENTER] and right click, select "New> Boolean

Type "content.interrupt.parsing," click "ok", set the value to "False" and click "ok".

5. Block Flash
Flash animation in which there is disrupt any, appear to overwrite the contents page of a site that you want to read or see, and slow browsing. Fortunately there is a solution that is easy. Install the extension "Flashblock" (flashblock.mozdev.org) and he will block all the trinkets Flash when loading sites to be displayed more quickly. If you find the look you want to see Flash simply click on the place to download and view with normal appearance.


6. Increase the size of Cache
When surfing Firefox will save the image and script in the local cache memory where you can accelerate the data when visiting the same site again. If you have a large RAM (2GB or more), leave Firefox running longer, so visit back pages of the site will be faster, especially with a large cache.

Type "about: config" and press [ENTER], and then right click and select "New> integer."

Type "browser.cache.memory.capacity," click "ok", enter "65536" and click "ok", and "restart" the browser's cache to get a new and larger.

7. Activate TraceMonkey
TraceMonkey Javascript is a new engine from the Mozilla super fast, even in some normally print the value of 40x greater than the current version. Tracemonkey may be currently in the development stage and is still a little buggy, but if you object to use the software in the development stage, get the latest nightly build from (ftp://ftp.mozilla.org/pub/firefox/nightly/latest-trunk/ ). The first beta version of Firefox 3.1 is also scheduled for this month also issued.

Type "about: config" in the address box and press [ENTER].

Type in "JIT" in the filter box, and then double-click "javascript.options.jit.chrome" and "javascript.options.jit.content" to change the value to "true". Congratulations!, Now you have been using the current Firefox JavaScript engine.

8. Compress data
If you have a slow Internet connection, you may feel that Firefox is not performing well. It’s not entirely true! Install toonel.net and Java applications will take over your Internet traffic through its own servers. All the data through the server Toonel and compressed so that the data need to download a browser less.

In fact, Toonel also compressing JPEG, but of course impact on the quality of the picture. This useful tips to cut the amount of data that is sent, useful if you have an Internet account per month for a limited time or using a slow Internet connection such as GPRS.

Minggu, 07 Agustus 2011

How To Turn Off Monitor automatically

1 komentar
To change the elapsed time before your monitor automatically turns off

You must be logged on as an administrator or a member of either the Administrators or Power Users group in order to complete this procedure. If your computer is connected to a network, network policy settings might also prevent you from completing this procedure.
  1. Open Power Options in Control Panel.
  2. To open Power Options, click Start, click Control Panel, click Performance and Maintenance, and then click Power Options.
  3. In Turn off monitor, click the arrow, and select the time you want.


Notes :
  • If Turn off monitor is not available, your monitor does not support this feature.
  • Using Power Options in Control Panel, you can adjust any power management option that your computer's unique hardware configuration supports. Because these options may vary widely from computer to computer, the options described may differ from what you see. Power Options automatically detects what is available on your computer and shows you only the options that you can control.

Rabu, 03 Agustus 2011

Disable and enable the usage of USB storage devices

0 komentar
USB storage - a possible security risk?

Decent IT administrators secure their networks behind firewalls. They install mail filters on their SMTP servers and deploy anti-virus software on all client workstations. But securing the network is not sufficient -- what happens if the users bring their own USB memory sticks and connect them to the computers at their office? A 1 Gb USB stick can sometimes hold an entire company's vital data. Within minutes or even seconds an employee has all the files they need in order to start up their own business and take all the customers with them. Alternatively, what happens if a careless user accidentally compromises the network with an infected USB stick?


What does Microsoft have to say about it?

If you, the administrator, want to establish a minimum level of security, it is absolutely necessary to control which users can connect USB memory sticks to a computer. Unfortunately, a default Windows XP or Windows 2000 installation comes with no limitations on who is able to install and use USB storage media. Microsoft knowledge base article 823732 contains instructions on how to disable USB storage access for a certain group of users; however, the article only distinguishes between whether or not a USB storage device has been installed on a particular computer. Furthermore, the instructions are limited to a stand-alone computer. According to the general rule of thumb "If it's tedious, there is a better way", I try to avoid techniques that force me to repeat certain tasks for each computer that I manage. That's what group policy objects (GPO) are for.


To Disable and enable your USB storage device, follow this steps :

* To edit this feature, you will need to be logged into your computer with administrative rights.
* First click on Start button to open "Run" and type "regedit" then press Ok button to open the Registry Editor.

In registry editor locate the given path:

HKEY_LOCAL_MACHINE\SYSTEM\CurrentControlSet\Services\USBSTOR

Here select the "USBSTOR" folder and in right side of the registry editor panel find the value with name "Start".

Double click on "Start" and then set its value 4 under "Value data" section.

Close the Registry editor and restart your computer for changes to apply.

Now when you want to restore the default setting, open the Registry Editor and set its value back to 3.

Now again close the Registry editor and restart your computer for changes to apply.

Selasa, 02 Agustus 2011

Increase the Browsing and Downloading speed in Windows Vista

0 komentar
With windows Vista you have noticed the slow internet speed. The web browsing and downloading speed is very slow as compare to previous versions of windows. You can open the same sites in windows XP and server 2003 with the normal speed.

Follow the given steps to increase the Vista browsing speed:

First go to Internet Option and go to Advance tab in Internet Explorer and turn off the TLS (Transport Layer Security) encryption option. Here to fix problem with some secure pages turn on the SSL 2.0 (Secure Sockets Layer) feature and click Ok button to close it.


In windows Vista, the TCP autotuning feature is enabled by default. Some web servers do not respond properly to this feature, so it appears that some sites open with very slow speed.

To use this feature, you will need to be logged into your computer with administrative rights.

First click on Start button and type CMD in Run option then press Enter.

At Command Prompt, type the following command and press enter.

netsh interface tcp set global autotuninglevel= disabled

This command will disable the TCP autotuning feature. Now close the command Prompt and restart your computer after any changes to go into effect.

You can easily restore these setting by typing the following command at Command Prompt.

netsh interface tcp set global autotuninglevel= normal
Now close the command Prompt and again restart your computer after any changes to go into effect.

Senin, 01 Agustus 2011

Disable Unnecessary Processes in computer

0 komentar
The Applications tab in Windows Task Manager only shows the main programs that are running. However, this is not everything: there are also various Processes that run too. Click on the Processes tab to see them.

Many of the processes listed in Task Manager will be legitimate tools required for Windows and other programs to run properly. But you may also find some here that you don't need (and sometimes you may find a process belonging to a harmful virus or spyware program).

The information given here shows you the name of the process and also how much processor (CPU) time it is using up as a percentage of the total available. You can also see the amount of memory the program consumes.


You can right-click on any process and choose End process to stop it running temporarily, but it will most likely start up again when you restart your PC. You should be very careful when ending a process that you do not stop a process that is required by Windows.

You can identify what a process is for by using the Web. Type the name of the process, such as "svchost.exe" into a search engine and see what people have to say about it. If they say it is not required it should be OK to stop it. They may also give instructions on how to remove it permanently so it does not reappear in future.

Sabtu, 16 Juli 2011

The Cause and How BSoD is Occurred

0 komentar
Blue Screen of Death (BSoD) may occur due to several reason:

1. Virus or Spyware attacks
Virus or Spyware may cause your computer in high risk face this BSoD. It’s attacksyour computer without your conscious. This Virus or Spyware can attack BIOS, Driver Device that brings to damage the files therein.

2. Hardware failure
If hardware or computer device is can not be fully functional or damaged, Windows Stop Error will occur. Including the CPU is too hot.

3. Software Failure
Software that has a problem while installation process maybe has a problem to interact with Windows because while installation process there is having damaged files. Software which do not match with the Windows also may cause this BSoD, for example Windows Vista require a software which are only specially developed for this operating system and do not install a software that may not operate with this windows Vista.

4. Driver Device
When new hardware installed to computer and its driver in not suitable, wrong or not updated for the hardware will cause the hardware can not communicate very well with windows.

5. Startup Error
Hardware error, damaged driver, corrupt file volume, system misconfiguration and virus attack can cause windows can not operate while boot process. All error will display before windows is presented. While boot process, Windows can not communicate with the related file perfect.

6. Registry Error
Damaged in the Registry may happen not be presumed, This Windows Registry contains a complete system configuration including hardware configuration and driver device. If there have an erratum on Registry system, its easily cause system fail to work and cause to BSoB.

Sabtu, 25 Juni 2011

How to Change the Sizing Margins Inches into centimeters in Office 2007

1 komentar
Mengatur margin adalah hal yang penting termasuk ilmu komputer tentang cara mengubah format inch menjadi centimeter office 2007 adalah hal yang mutlak diperlukan dalam melakukan editing artikel, khususnya orang indonesia yang sehari menggunakan besaran meter dalam menghitung besaran panjang sehingga format default microsoft office word 2007 dalam inch harus diubah menjadi centimeter agar sesuai dengan penggunaan besaran untuk menghitung panjang di indonesia.

Untuk mengubah format inch menjadi centimeter pada office 2007 bisa dilakukan dengan cara sebagai berikut :

  1. Jalankan microsoft office word 2007
  2. Arahkan petunjuk mouse pada bagian Menu Bar (Home, Insert, Page Layout, References, Mailings, Review, View) atau bisa juga disebelah kanan menu-menu tersebut.
  3. Klik kanan dan pilih Customize Quick Access Toolbar sehingga tampil jendela Word Options
  4. Perhatikan dibagian sebelah kiri terdapat menu-menu yang bisa digunakan dalam mengatur Ms. Office Word 2007 dan salah satunya adalah menu Advanced, klik menu Advanced
  5. Klik Scroll Mouse ke bawah dan temukan sub menu Display
  6. Atur pilihan pada Show Measurements In Units of : yang defaultnya Inch menjadi Centimeter
  7. Klik OK dan selesai

Coba kembali ke dokumen anda dan perhatikan ruler lina sudah berubah dalam format centimeter, begitu juga dengan format yang berhubungan dengan pengaturan margin pada office word 2007 sudah berubah menjadi centimeter.

The Importance of Computers

0 komentar
Select hundred people randomly and ask each one of them what the biggest invention of the century is and quite surely, more than ninety percent of them will say that it is the invention of computer. Just think how significantly computers have contributed to the rapid development in global technology. Computers have benefited us in all possible spheres of life. From mere clerical jobs to the making of million dollar movies, computers are bound to be used in each and every activity that takes place in today’s world. The first personal computer was invented in 1970 and since then, there have been constant developments in the field of computers and now, almost all homes in the urban world have a PC to flaunt.

The factors which have made computers a success are definitely speed, accuracy, data storage and multi tasking. How much time does it take for you to communicate with someone sitting in a different continent of the world using a computer? The answer will be not more than 5 seconds. You can say that it is possible more because of the internet but computer and internet is largely interdependent on each other. Even for performing complex calculations, computer hardly takes a noticeable amount of time. Computer has also enabled storing large quantity of data in a digital format to make things more convenient for us. Not a single big organization in the world can now think of operating without using computers. The progress that has taken place in businesses and economies worldwide in recent years wouldn’t have been possible without computers.

There isn’t a single machine invented till date having so many multiple uses. Be it education, entertainment, business or communication, for whatever purpose you want to use a computer, it will successfully satisfy you. The advent of portable computers has made things better for us. Nowadays, there are various types of computers which we may choose from according to our needs and requirements.

Desktop models are the most commonly used computers worldwide. A desktop model computer normally comprises of a CPU, monitor, USP, mouse and keyboard. It is called desktop because it can be fitted on the top of a desk easily. The main disadvantage of a desktop computer is the lack of mobility. To solve this problem, IBM came up with the first ever Laptop in 1986. Laptops are compact computers weighing extremely light and small in size which can be taken places. Laptop computers are nowadays referred to as Notebooks and they are constantly becoming popular worldwide. One can do the same work in a notebook which he/she does in a desktop computer but at the same time it is possible to carry a notebook to any place as it hardly weighs more than 6 pounds.

Other specialized laptops are also built nowadays which are meant for specific purposes. For example, laptops that are made only for the objective of internet browsing are called Netbooks. These are even lighter and smaller forms of computers. Many other innovations are also happening and you can also have devices like Palmtops or PDAs which are very much fall under different types of computers but their functions are limited to a certain extent.

Registry Cleaner Software

1 komentar
The registry cleaners, as they are most commonly known as, are nothing but a set of utility programs that are essentially responsible in order to clean up the registry of the Windows and remove the various unwanted junk of registry files out of the computer. The registry cleaners are popular among multiple users throughout the world but as far as the effectiveness of these utility software programs are concerned, they are really not reliable enough.

The Purpose
The main function of the implementation of the registry cleaners is with the motivation of getting rid of certain data from its existence that are the key to the possible junks that occur in the respective Windows registry. These registry data junk are nothing but unwanted lot of files that are not required for usage. It is not a good idea to slow down one’s system with the bulk of these registry files.

The collection of these files actually occurs with the bunch of certain information, which may be related to some of the software that has been eventually not properly installed or implemented in the respective system. The registry cleaners indulge in a thorough scan which possibly attempts to remove these unnecessary bunches of the registry records.


Effectiveness
The registry cleaning software programs are well known as the utility software collection of programs that are quite effective in the increased performance of the computer. The registry cleaners are supposed to provide a provision to keep backup information and initiate the restoration of the functions that may be useful later on. The registry files possess lot of the disk space which results in the slowing down of the computer system.

Disadvantages
The ineffectiveness of the various registry cleaning software programs is one of the key disadvantages that are noticed by the experts. The cleaners are supposed to provide a deep pore cleaning and drive out the respective registry files theory, initiating the increase and the efficiency of the performance of the computer system. Hardly any such change is noticed and experienced.

Expensive Versus Cheaper Computer Video Cards

0 komentar
Today’s desktop computers are all about what goes inside of them. Each component of your desktop computers has a different function, and each one can be upgraded. One component of desktop computers that may be of particular interest to you is the computer video card.

Today’s desktop computers are all about what goes inside of them. Each component of your desktop computers has a different function, and each one can be upgraded. One component of desktop computers that may be of particular interest to you is the computer video card.

What Do Computer Video Cards Do For Desktop Computers?
Your video card controls your computer graphics. Those of us who are old enough can remember back to the days where a computer screen had two colors and was simply lines, space and text. No pictures, no icons, forget about video games unless you enjoyed text-based adventures (basically a “Choose Your Own Adventure” book on a computer screen). That was before the modern video card. These handy pieces of equipment turned desktop computers into fully interactive experiences, allowing games, Power Point presentations, and even computer art.


Why You Need Computer Video Cards
You probably noticed that your computer provides all those wonderful pictures, animated avatars and so forth without you having to add anything. That’s because most desktop computers come with a video card built in. However, for the most advanced and realistic graphics, you may need to upgrade your video card. Then the question becomes, should you spring for the most expensive card, the cheapest, or something in between?

The Differences Between Cheaper and More Expensive Computer Video Cards
A lot of it, believe it or not, comes down to the type of monitor you’re using. If you’re working with a laptop, you probably don’t need the most expensive video card, because frankly, your monitor doesn’t have the resolution for it. Think of your eyes. You could have 20/20 vision, but if your binoculars are of low quality, you still won’t be able to see all that far.

On the other hand, if you’ve got an extremely large monitor, or a very high resolution monitor, or multiple monitors, or some combination of these, you might benefit from a more expensive video card. Even in this case, you need to consider what you’re using the video card for. If you’re mostly playing Flash games, or doing the occasional school project with accompanying graphs, your basic upgraded video card will probably do you very nicely. On the other hand, if you’re a video game purist, or are doing complex technical presentations, you may want to spring for the more expensive card.

Final Note on Computer Video Cards for Desktop Computers
One final word of caution. Like many things in the computer world, video cards tend to evolve very quickly. The card you shelled out big bucks for a month ago may be considered ancient history today. If you see a video card you like, you might want to wait a bit for the price to come down and/or for it to be available at a discount. If you must have state-of-the-art, do your research and make sure the new video card coming out tomorrow isn’t going to put the one you’re planning to buy today to shame.

The Random Re-Boot Problem

0 komentar
You may have experienced your computer intermittently re-booting for no apparent reason. This can be annoying, and can mean you have lost valuable work that you we in the process of creating. If this has happened once, then your chances of explaining the cause are remote in the extreme. If you find it happening regularly, then it is clearly in your interest to find and fix the problem.

There may be a simple explanation. With most modern computers, the system comes with built in circuitry to monitor the state of the computer. One of the checks built into your system include testing the power supply levels. The power supply is not a component most people expect to fail. Most are concerned that their disk drives will be the major cause of failures, but in fact power supply problems are relatively common. The power supply will communicate to the mother board with a power good signal if the power output is within specification. If this power good signal is not present, the computer will simply not start up. This seems simple enough, however things do not always fit into the good or not good categories. Where you have a power supply that is failing, its outputs can fluctuate.

The computer may then boot up correctly, but a little later when the power supply falls out of range the computer will detect this and activate the reset logic. The reset logic shuts the machine down, thus relieving the load on the power supply, which can then support a re-boot. It is the same as if you pushed the reset button yourself, but it appears to you as a random re-boot. To test the power outputs, you really need access to a multimeter, and know how to use it. This might be something you may prefer to leave to an experienced technician. Alternatively, you can try replacing the power supply with a spare that you know to be working.

If this corrects the intermittent re-boot, then you have solved the problem. When replacing a power supply, select a known brand, and I suggest you choose one that is rated to at least 400 watts. This, of course, depends on what load your computer is supporting. Upgrading to a faster processor, installing additional or faster disk drives, or adding other devices can all add to your computer’s power requirements.

Become Your Own PC Repairer

0 komentar
If you are like me, you have probably owned quite a few personal computers. You are sure to have had the occasional problem, and rushed the machine off to the repair shop. At the time, the cost of repairs may have seemed a bit high in proportion to the original cost of the machine, and you might not have been quite sure what was actually done.

You can learn to do your own diagnosis and repair work. It is worth while knowing what is going on inside the box, even if you do not do the work yourself. With a good understanding of the likely causes of the hardware problems, you can be a lot more confident that the repairs carried out were reasonable and necessary.

To begin with, a good source of technical information is necessary. You can always ask at your local electronics shop, but if you really don’t know what you are talking about, the embarrassment can be a big turn off. There is an excellent book available called ‘Upgrading and Repairing PCs’ written by Scott Mueller. This is the most complete and most readable ‘how-to’ book I have found, and if you only buy one book on the subject, Scott’s is the one to get you hands on.

The next step is to choose a few projects to get familiar with the hardware. The best way to begin building up your skills is to pull a computer completely apart, and then put it back together. If it still works after that, then you have made a pretty good start. At this stage, you may be thinking ‘hang on a minute, I paid a lot of money for my system – No way am I going to risk messing with that baby’.

No, as a beginner, you definitely should not. You can get hold of some old computers to tear apart and rebuild. Old computers are seen as worthless, and you will find Pentium 1 and 2 machines being discarded as rubbish, even though they are still in good working order. Even a Pentium 3 can be bought very cheaply, and most of these are pretty good performers. A word of warning – be careful how widely you spread the news of you new interest in old computers. You will be surprised how many 486s and older are sitting in cartons in garages and basements; your friends and family will really be delighted to give you an amazing collection of electronic junk.

Get familiar with the various parts, and how they fit together. Learn to identify the different styles of processor chip, RAM, disk drives and other components.
As always, safety is paramount. The computer components themselves operate at low voltages, but you still have the mains strength voltage coming into the back of the computer. Always power off and unplug when you are working on the computer, and be suspicious of any signs of overheating or of burning smells. Enjoy your tinkering.

The Benefits of Calibrating Your Monitor

0 komentar
Due to the rapid and ever growing development of digital technologies, the calibration of monitors is no longer the exclusive concern of professional editors and photographers. Nowadays, virtually everyone who owns a digital still or video camera has a vested interest in making sure his/her monitor is correctly calibrated. Many people do not realize that the color, shade, and hue of a digital image (moving or otherwise) can look completely different on a computer monitor than it does in a camera, or on a printed page.

How many times have you printed out an image only to find that it bears little resemblance to the photograph you took? Or perhaps a certain section of a photo, the portion you altered in Photoshop, has a different look than what you previously saw on the screen? These are very common, but no less annoying, problems for those who use their computers creatively—people for whom the correct shade, hue, and color of an image are all-important.

Apple offers a very easy approach to monitor calibration. To check it out, go to System Preferences>Display. From here you can adjust the brightness of the monitor to meet your needs. For those who are working with detailed images a bright screen may contribute to clearer viewing of the subject matter. For those who may be staring at the screen for long stretches a dimmer monitor might help to ease the strain on the eyes.

Both Apple and PC “System Preferences” allow computer users to change the resolution of their respective displays. Generally, for detailed and precision work, a higher resolution is recommended—the image being far clearer at a setting of, say, 1440 x 900, than it will be at, 640 x 480.

On Macs, color calibration can also be modified through Systems Preferences. After setting up your resolution click, “Color,” and select one of many options. Selecting a “Target Gamma,” will allow you to set the contrast levels for your monitor. Choose “1.8 Gamma” for a traditional monitor setting, or “2.2 Television Gamma” if you are planning to work with images for television.

Selecting a “Target White Point” will allow you to adjust the tint of the display. Here you have the option to go with a yellow, bluish or natural noonday base white for your monitor. There are other more advanced settings, which are commonly used for computer owners with higher grade, professional needs.

If you are like most people, you probably spend a good portion of your life sitting in front of a computer monitor. Don’t you owe it to yourself to make sure, what you’re looking at for all those hours is as perfect as it can possibly be?

Computer Basics – Purchasing a New Computer

0 komentar
If you are planning to buy a computer for your own purpose, it will pay you in more than one ways to take some time out and know about the computer basics. Once you have a first hand idea about the computer basics by yourself, you will feel much better equipped in terms of selection and purchase of the computer.

The first thing you need to decide on is the type of computer – would you want a laptop or a desktop? Unless you have a job where you have to tour pretty regularly and also carry your computer with you during the tours, it is always advisable to opt for a desktop. The systems are relatively simpler with the desktops than the laptops, the latter being more sophisticated and more prone to malfunctioning. However, if you have extreme shortage of space at your home, in that case the laptop may be a wiser choice as it will never occupy a lot of space in your room. But, if you do not have any such constrain, it is always judicious to opt for the desktops.

The first thing you need to decide on is the type of computer – would you want a laptop or a desktop? Unless you have a job where you have to tour pretty regularly and also carry your computer with you during the tours, it is always advisable to opt for a desktop. The systems are relatively simpler with the desktops than the laptops, the latter being more sophisticated and more prone to malfunctioning. However, if you have extreme shortage of space at your home, in that case the laptop may be a wiser choice as it will never occupy a lot of space in your room. But, if you do not have any such constrain, it is always judicious to opt for the desktops.

Among the computer basics, the first thing that comes is the CPU – the Central Processing Unit. Often called the ‘brain of the computer’, the CPU is important for interpretation of whatever information the computer receives and to process all such data. It is this Central Processing Unit through which all other components of the computer are controlled and monitored.

Among the computer basics, the first thing that comes is the CPU – the Central Processing Unit. Often called the ‘brain of the computer’, the CPU is important for interpretation of whatever information the computer receives and to process all such data. It is this Central Processing Unit through which all other components of the computer are controlled and monitored.

Next in line in regards the computer basics comes the motherboard. System board, main board – these terms too are often used interchangeably with the more technical term – motherboard. If the CPU is the ‘brain’, then the motherboard is called the ‘heart of the computer.’ It is responsible for the primary circuit. All the important components of the computer – including the CPU, sounds and graphics cards, network cards, hard drives, etc. – are connected to it. There are several forms of motherboards. One of the very common types among them is the ATX.

RAM or the Random Access Memory forms yet another important thing in your idea about the computer basics. The RAM is the computer component that enables you to perform any task on the computer, be it running some program or processing some data, nothing can be done whatsoever without a proper RAM. The pace at which the past will be performed or processed by your computer depends to a great extent on the potential and performance of the RAM. Therefore, pay extra care to the selection of the RAM for your desktop PC while you buy them.

Another of the computer basics you need to get well acquainted with before purchasing the Desktop PC is the Hard Disk Drive (HDD). This Hard Disk Drive is responsible for all forms of data storage of the computer. Two types of HDD are most popular in this regard – the SATA (Serial Advanced Technology Attachment) IDE (Integrated Data Device).

Apart from them, there are a few other necessary elements that form parts of your knowledge of the computer basics like the optical drives, graphics cards, audio cards, etc. Get to something about them before finally deciding on your PC.